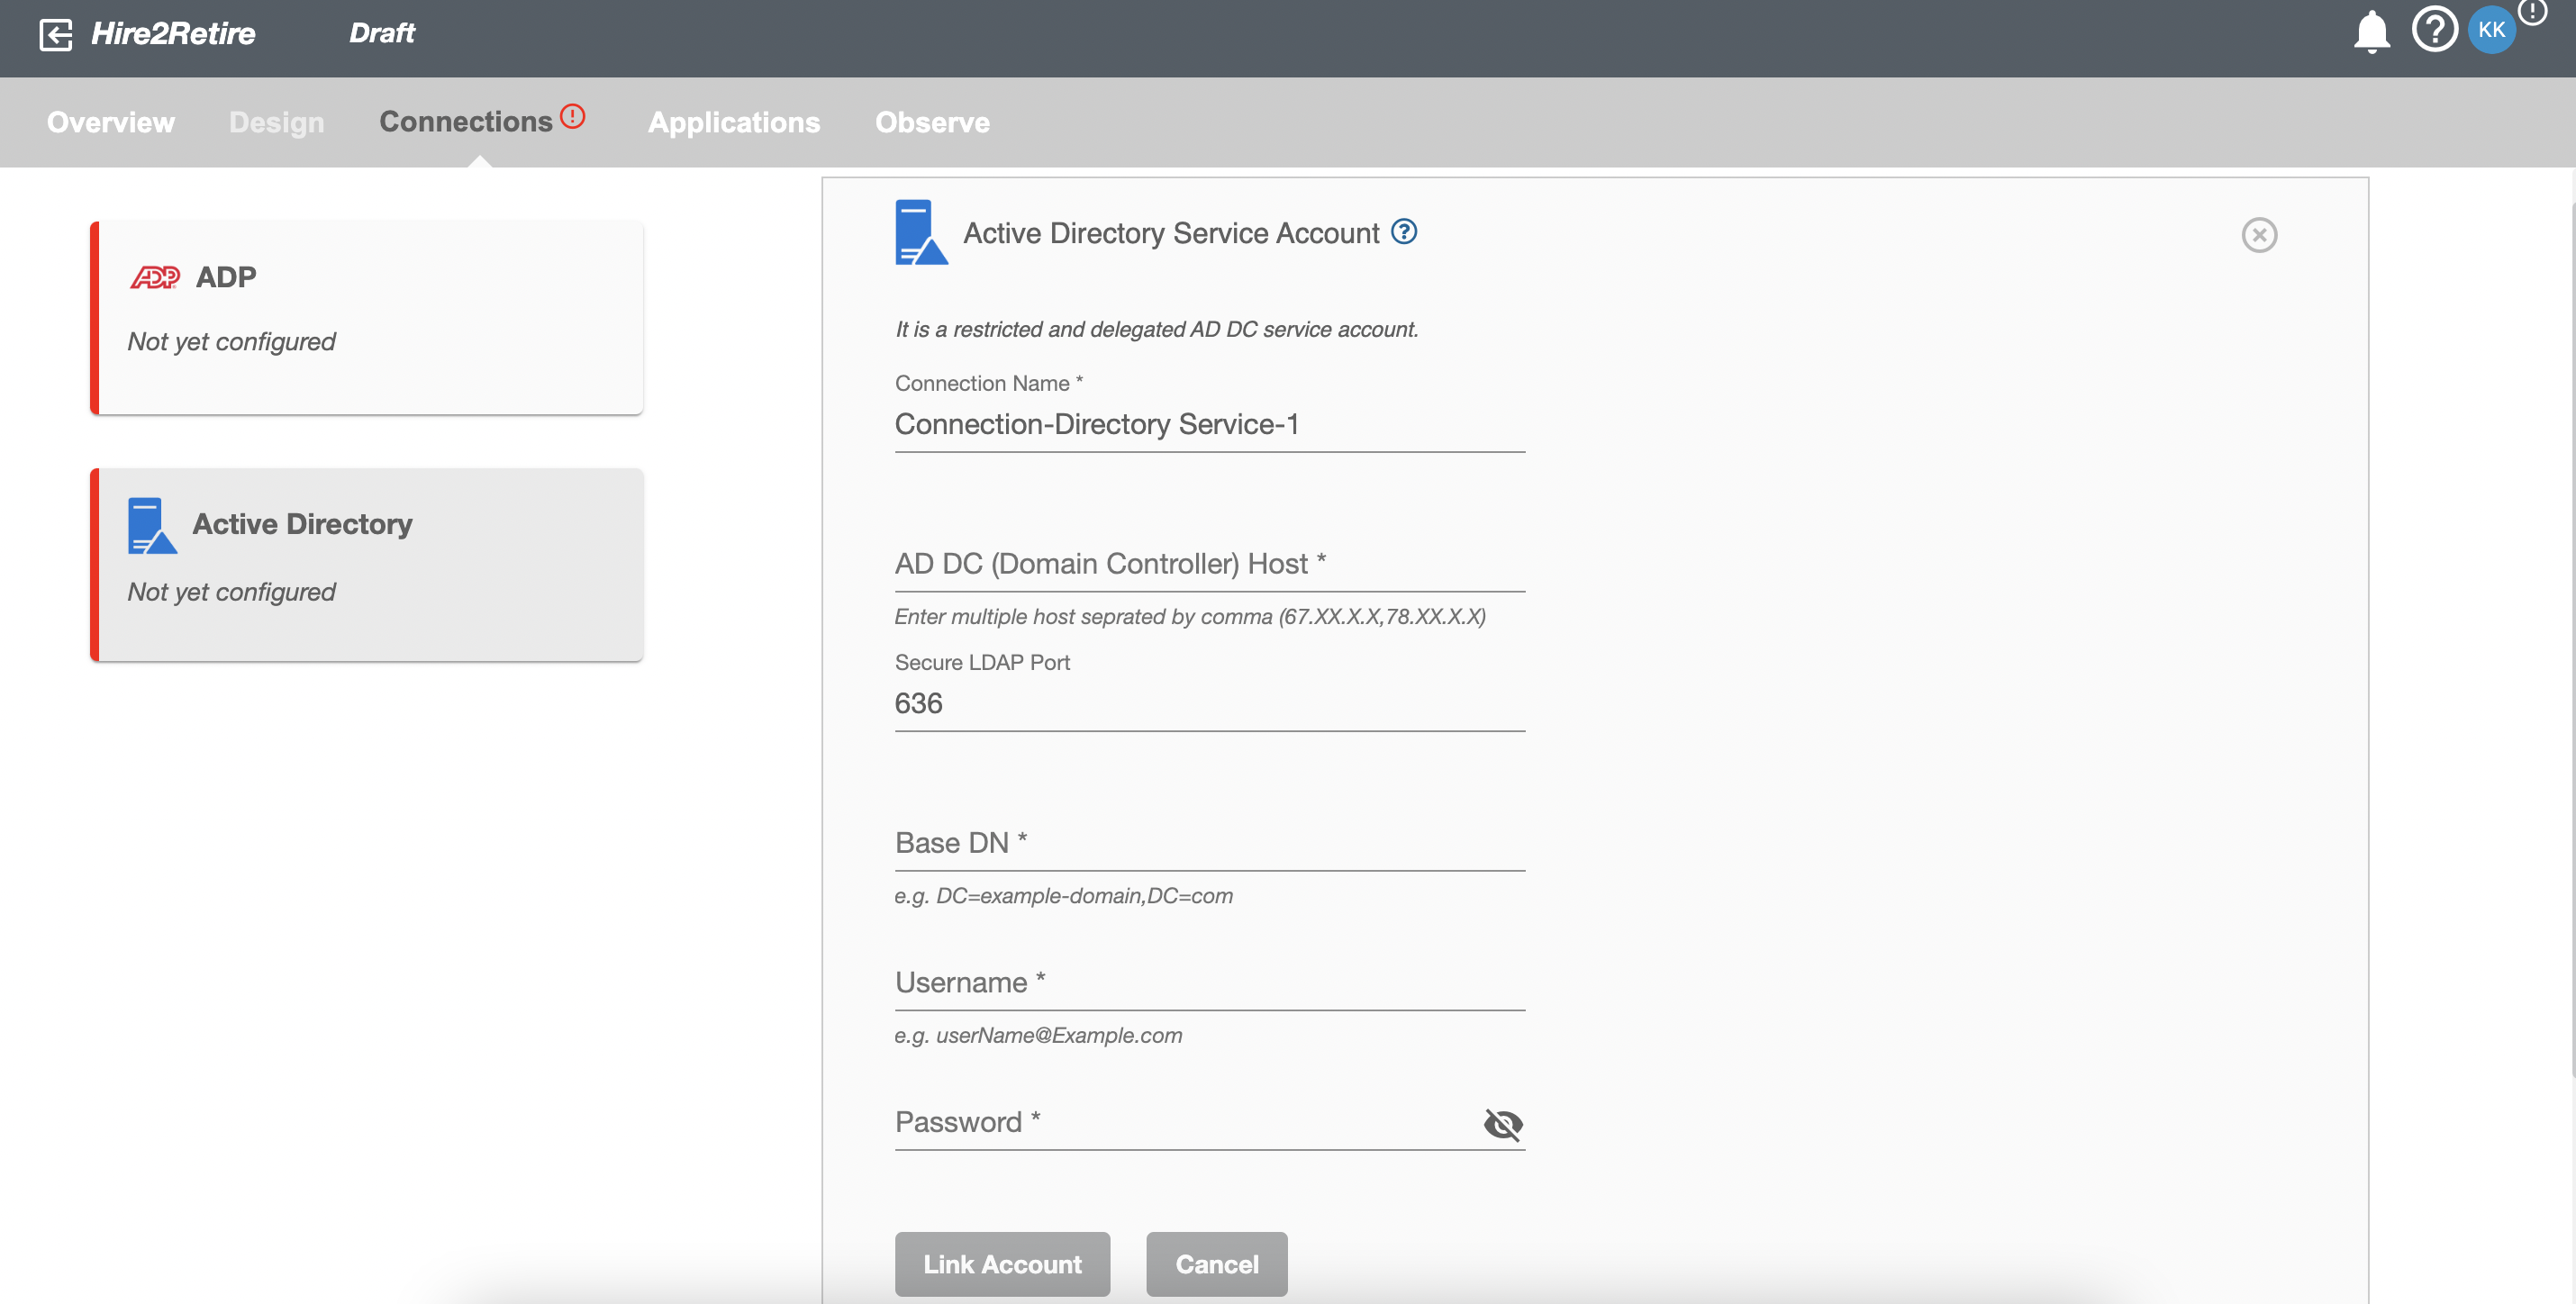
Active Directory Connection
Active Directory uses a Lightweight Directory Access Protocol (LDAP) based authorization. By linking your Active Directory account with Hire2Retire, you can authorize RoboMQ to perform operations to your Active Directory Domain Controller.
Hire2Retire product supports employee operations of onboarding, updating, termination, rehire and leave in Active Directory. Thus, the user account you use to establish the connection must satisfy one of the following criteria:
- Belong to the security group "Domain Admin".
- Set up delegate control of this user under the target Organization Units (OU).
Create a Connection
You can connect to your On Premise Active Directory using two methods
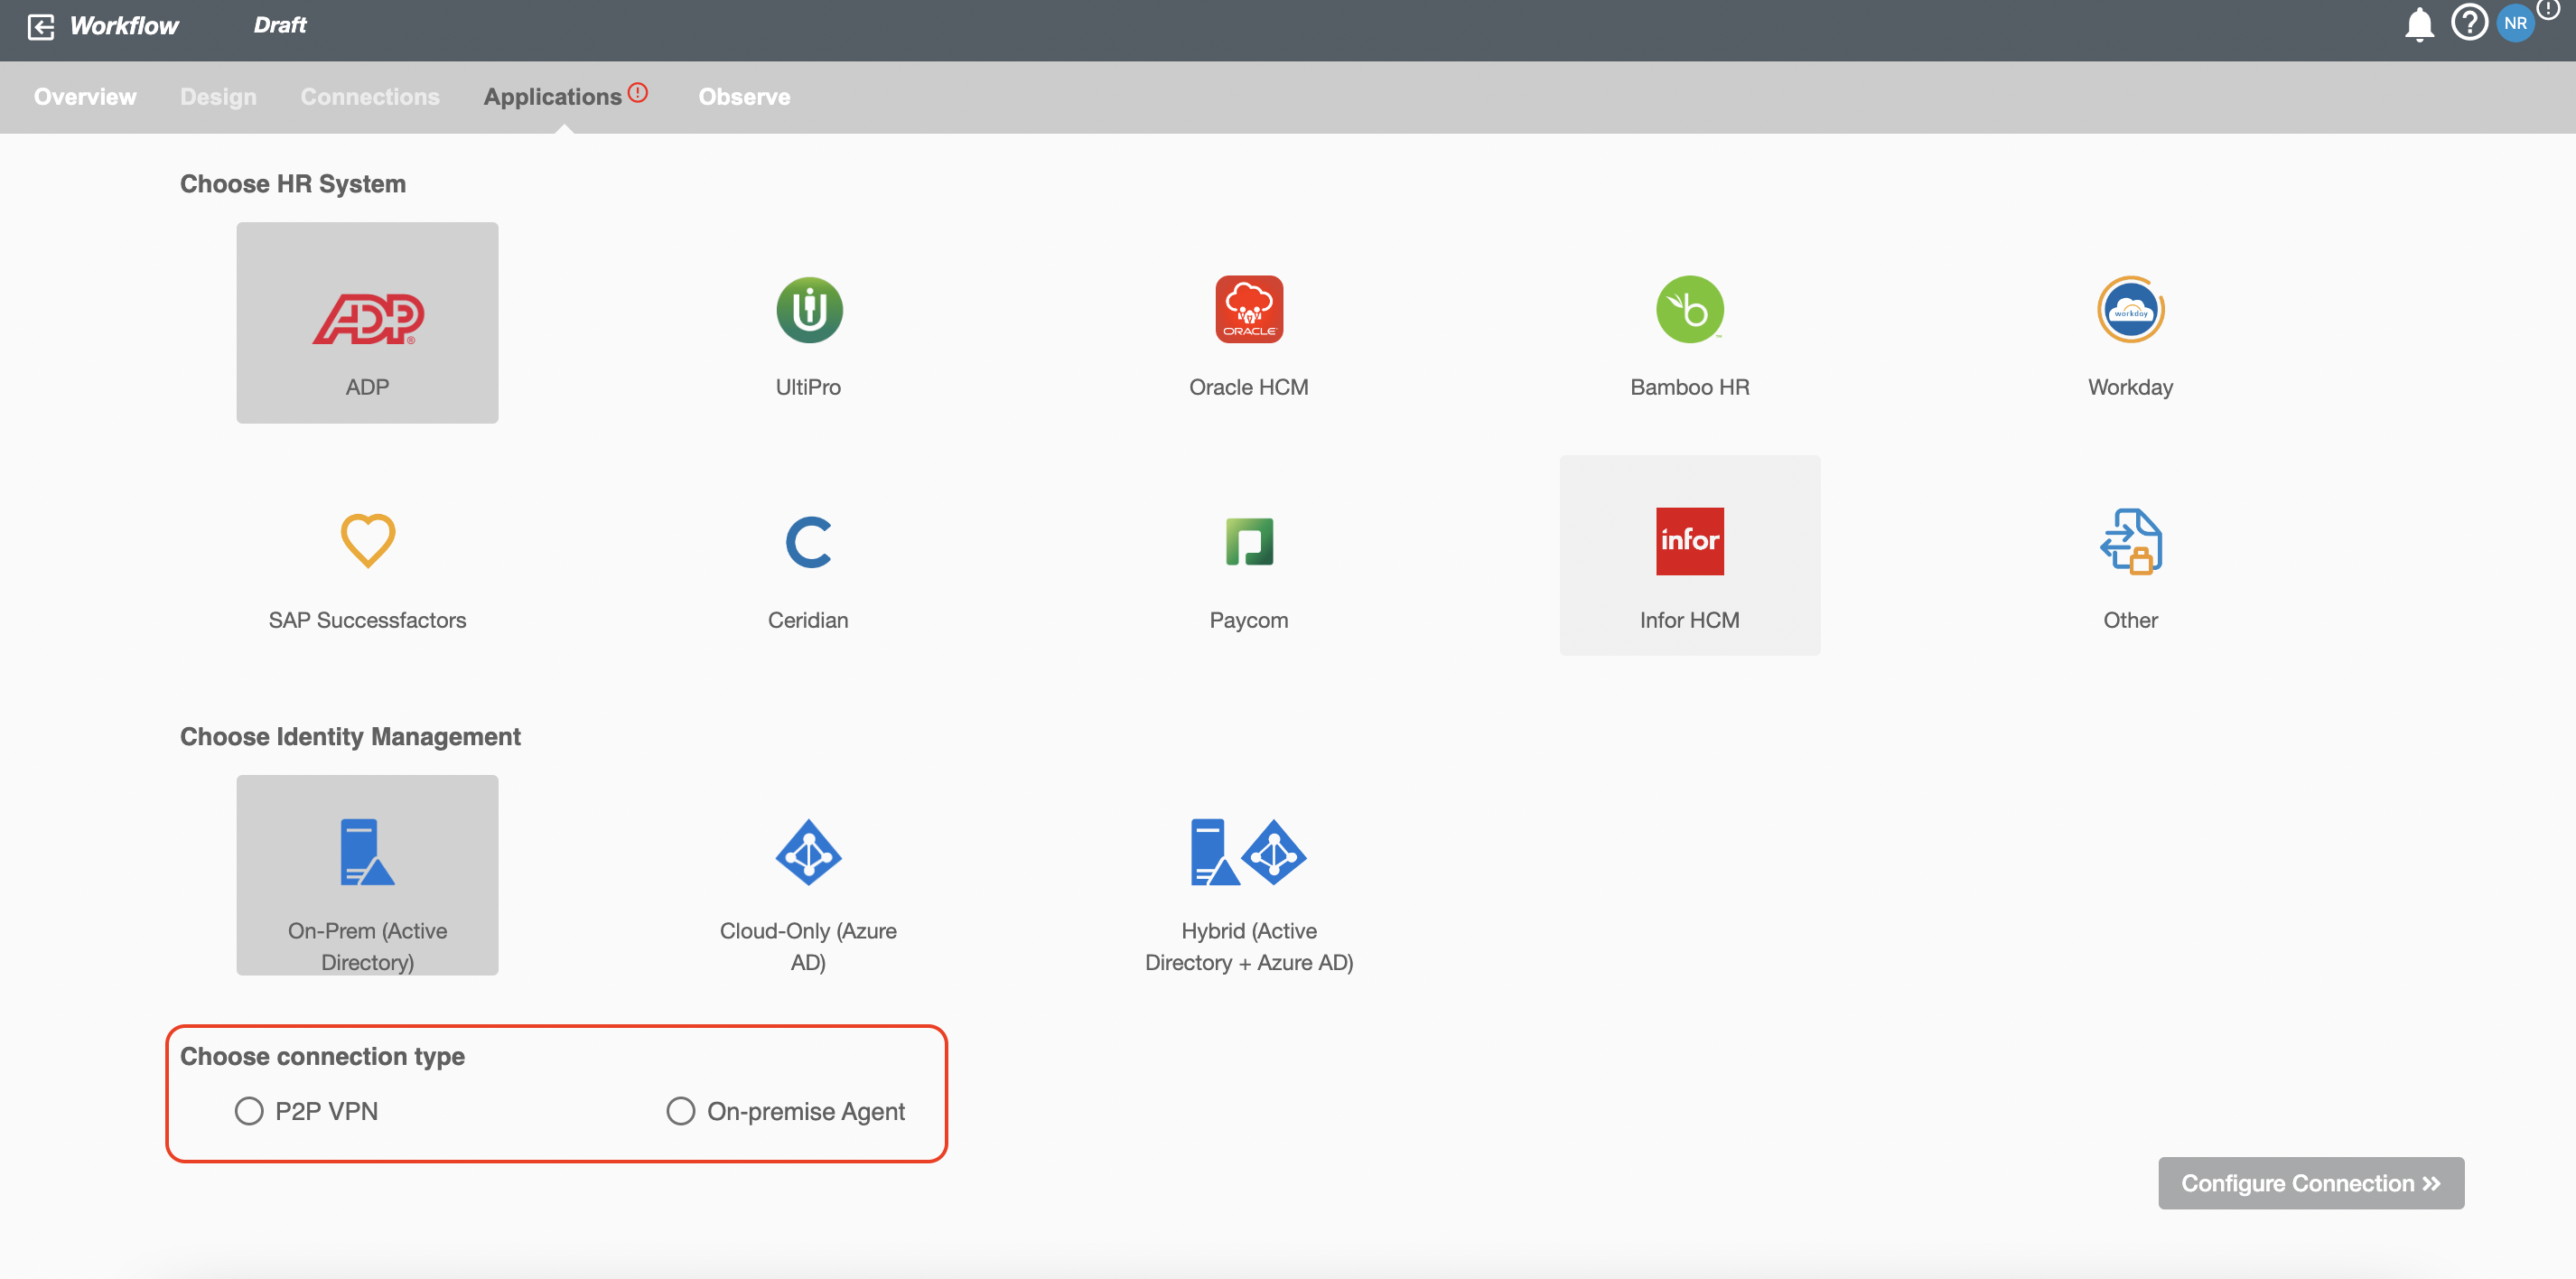
- P2P VPN
- On Premise Agent
P2P VPN
Hire2Retire requires the following details to create a connection to your Active Directory.
- Connection Name - A user defined nomenclature for your connection. By default, the connect name is "Connection-Directory Service", you can change the name as per your preferences.
- Host - The host name is the IP address of your Active Directory Server.
- Port - The TCP/IP port on which the Active Directory server is listening. Hire2Retire will only establish the LDAP connection with your SSL port. (The default is 636)
- Base DN - It is a collection of objects that Hire2Retire will access within an Active Directory network. An object can be a single user, a group of users or a hardware component, such as a computer or printer. Each base DN holds a database containing object identity information. It should be given in the format "DC=example-domain,DC=com"
- Username - The username to access the Active Directory server. Please make sure it belongs to the security group "Domain Admin" and has delegated control to target Organization Units (OU).
- Password - The Password to access the Active Directory server.
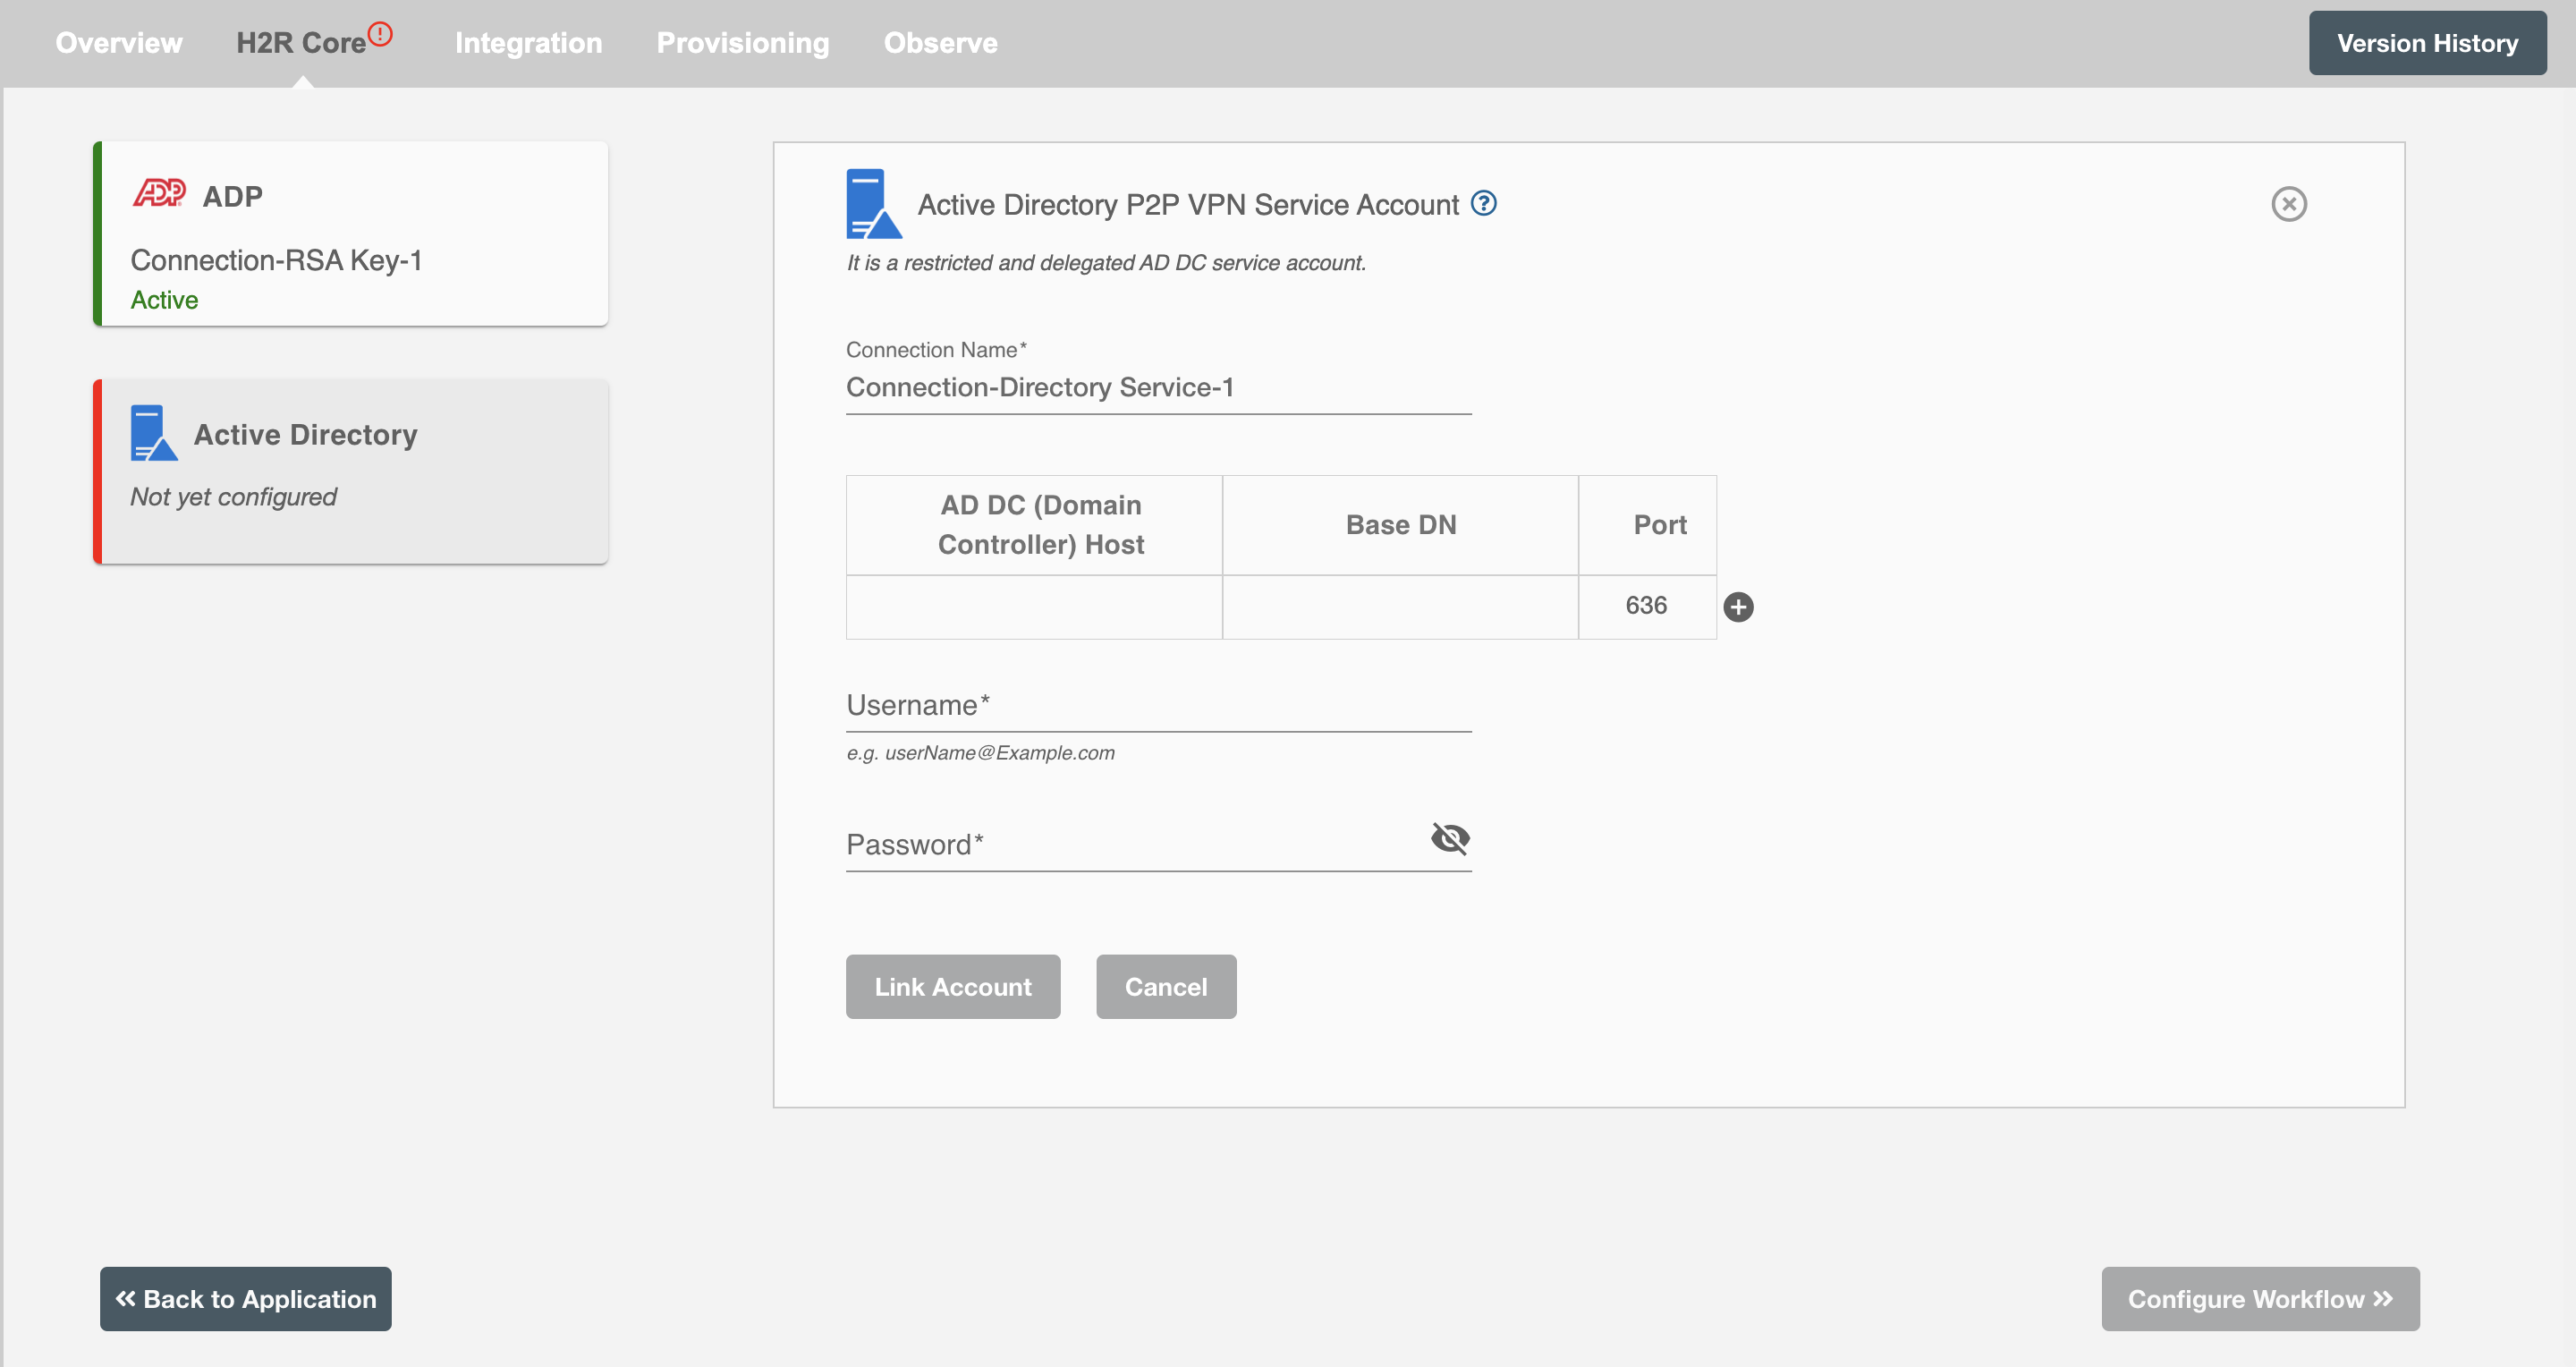
If you are configuring a connection with multi-domain controller setup, you can provide host values for each domain controller in your AD along with their respective base DN and port. You can also provide comma separated list of IP/host addresses for each domain controller.
On Premise Agent
Your application, database, or identity server might be deployed within your data center without public access. Hire2Retire “On-premise agent” provides a secure way to access the identity management server located behind your firewall without the need to open ports in the firewall or establish a VPN tunnel. On-Premise agent can be installed easily behind the firewall after which it can communicate with the workflow deployed.
Active Directory On-Premise Service Connection
Hire2Retire requires the following details to create a OnPremise Service Connection
- Connection Name - A user defined nomenclature for your connection. By default, the connection name is "Connection-OnPremise Service", you can change the name as per your preferences.
- Host - The host name is the IP address of your Active Directory Server.
- Port - The TCP/IP port on which the Active Directory server is listening. Hire2Retire will only establish the LDAP connection with the SSL port. (The default is 636)
- Base DN - It is a collection of objects that Hire2Retire will access within an Active Directory network. An object can be a single user, a group of users or a hardware component, such as a computer or printer. Each base DN holds a database containing object identity information. It should be given in the format "DC=example-domain,DC=com"
- Public key of RSA key pair - RSA public key which will be used to encrypt the config file. To know the detailed steps to generate RSA key pair, click here.
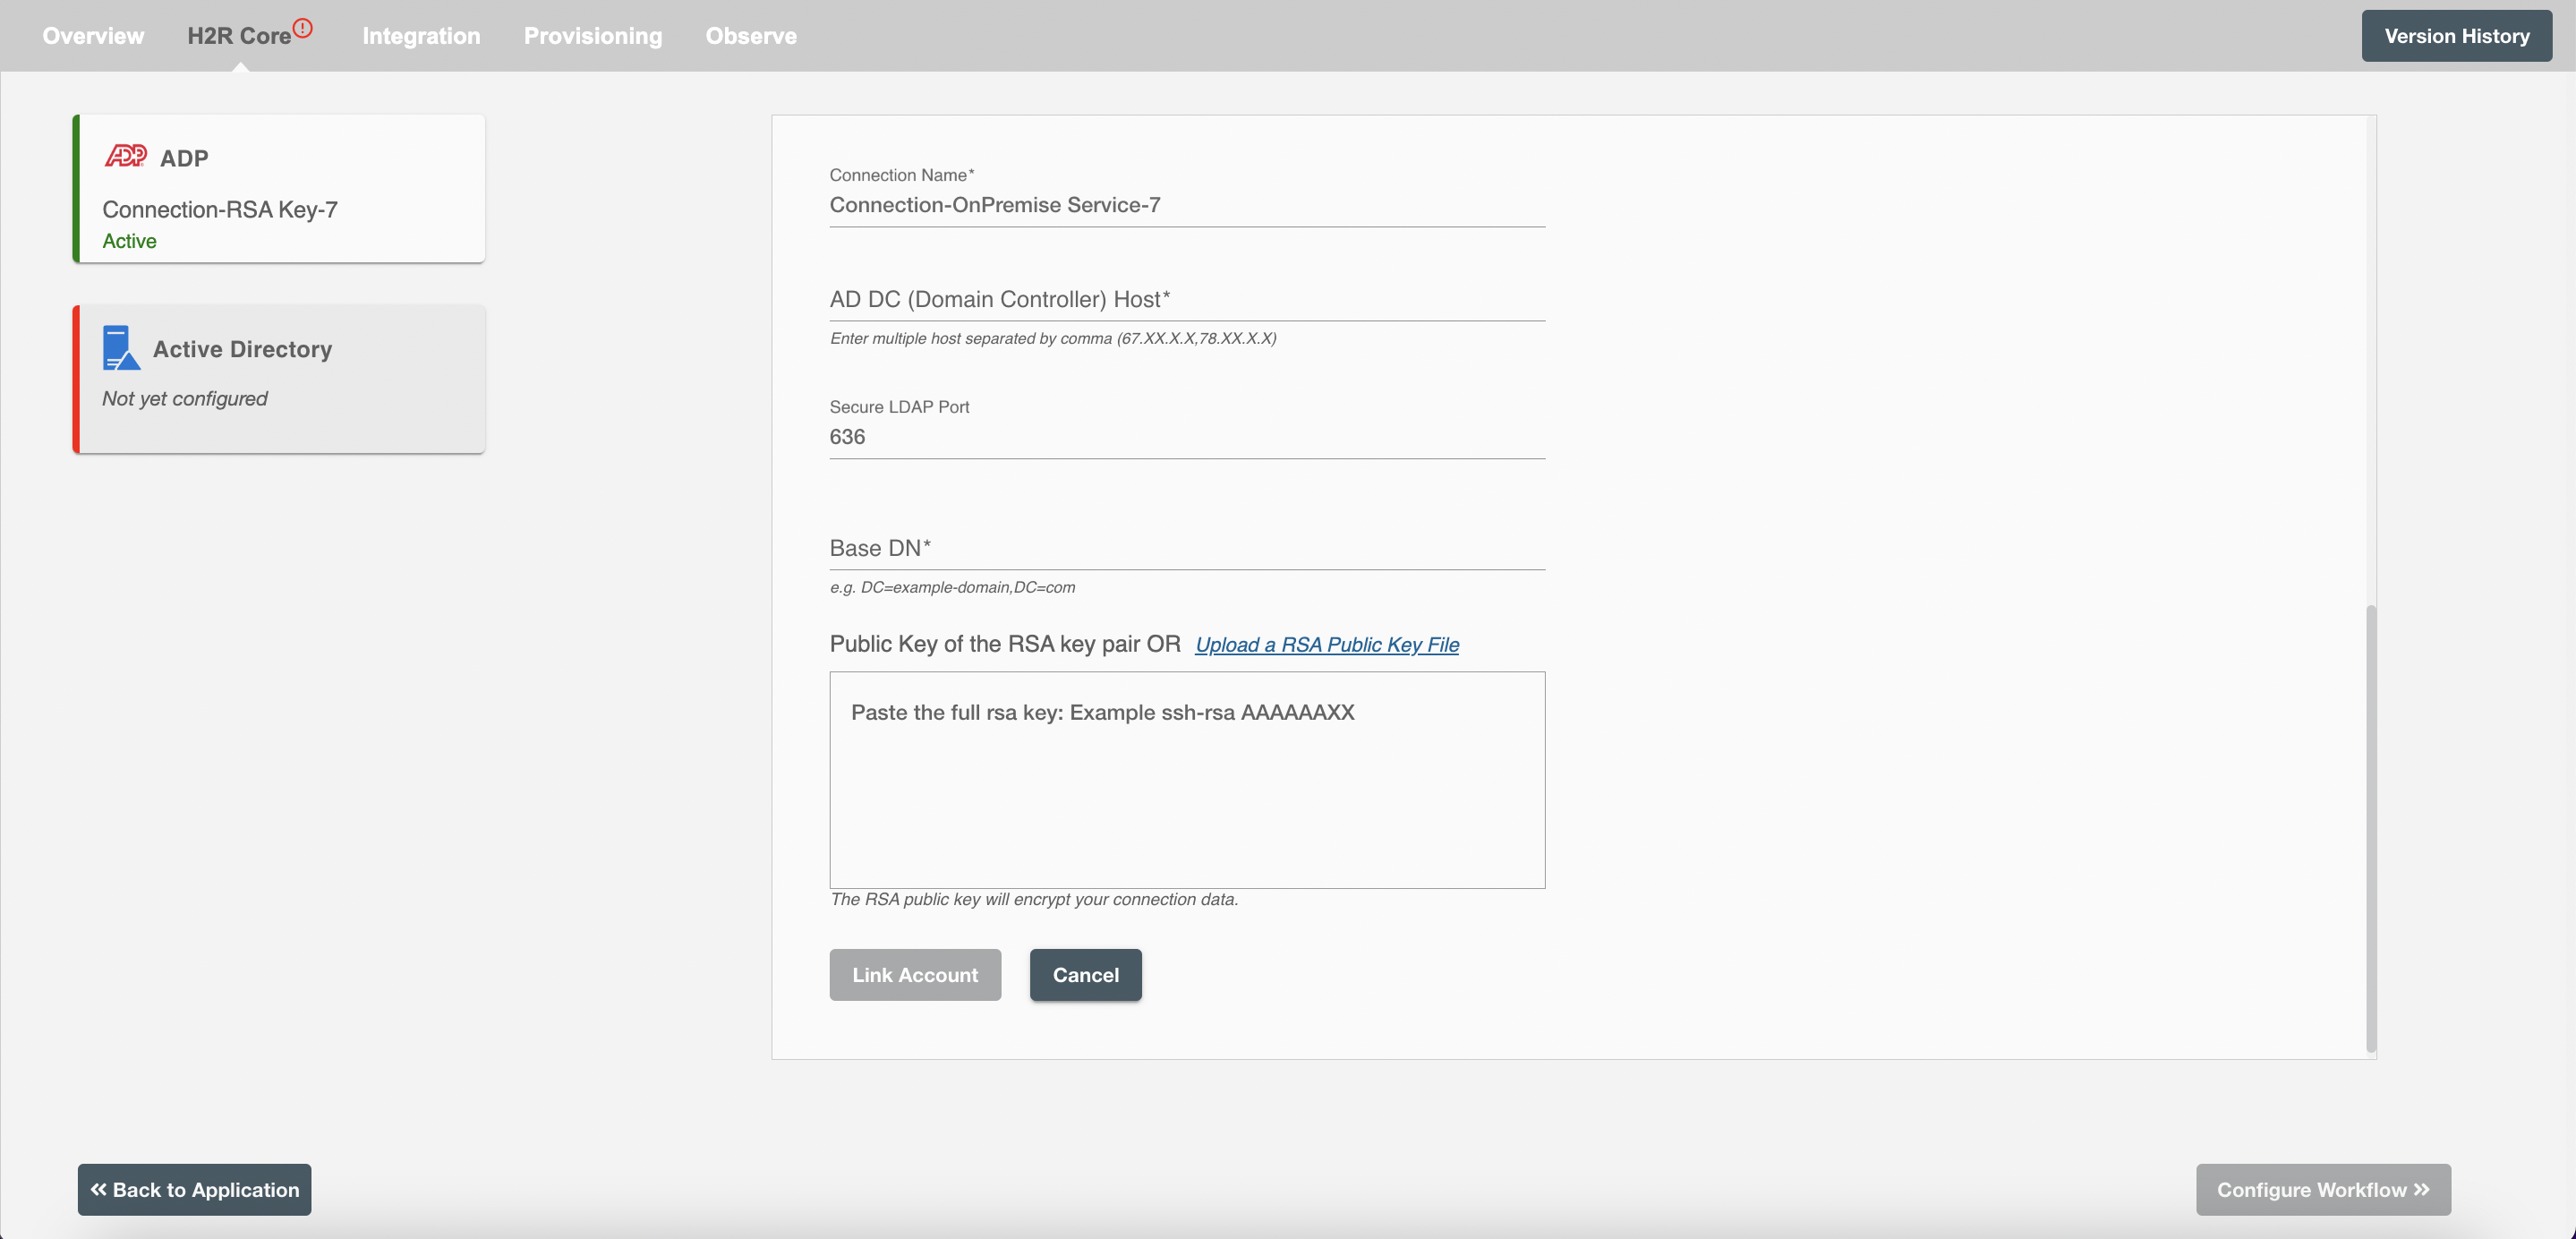
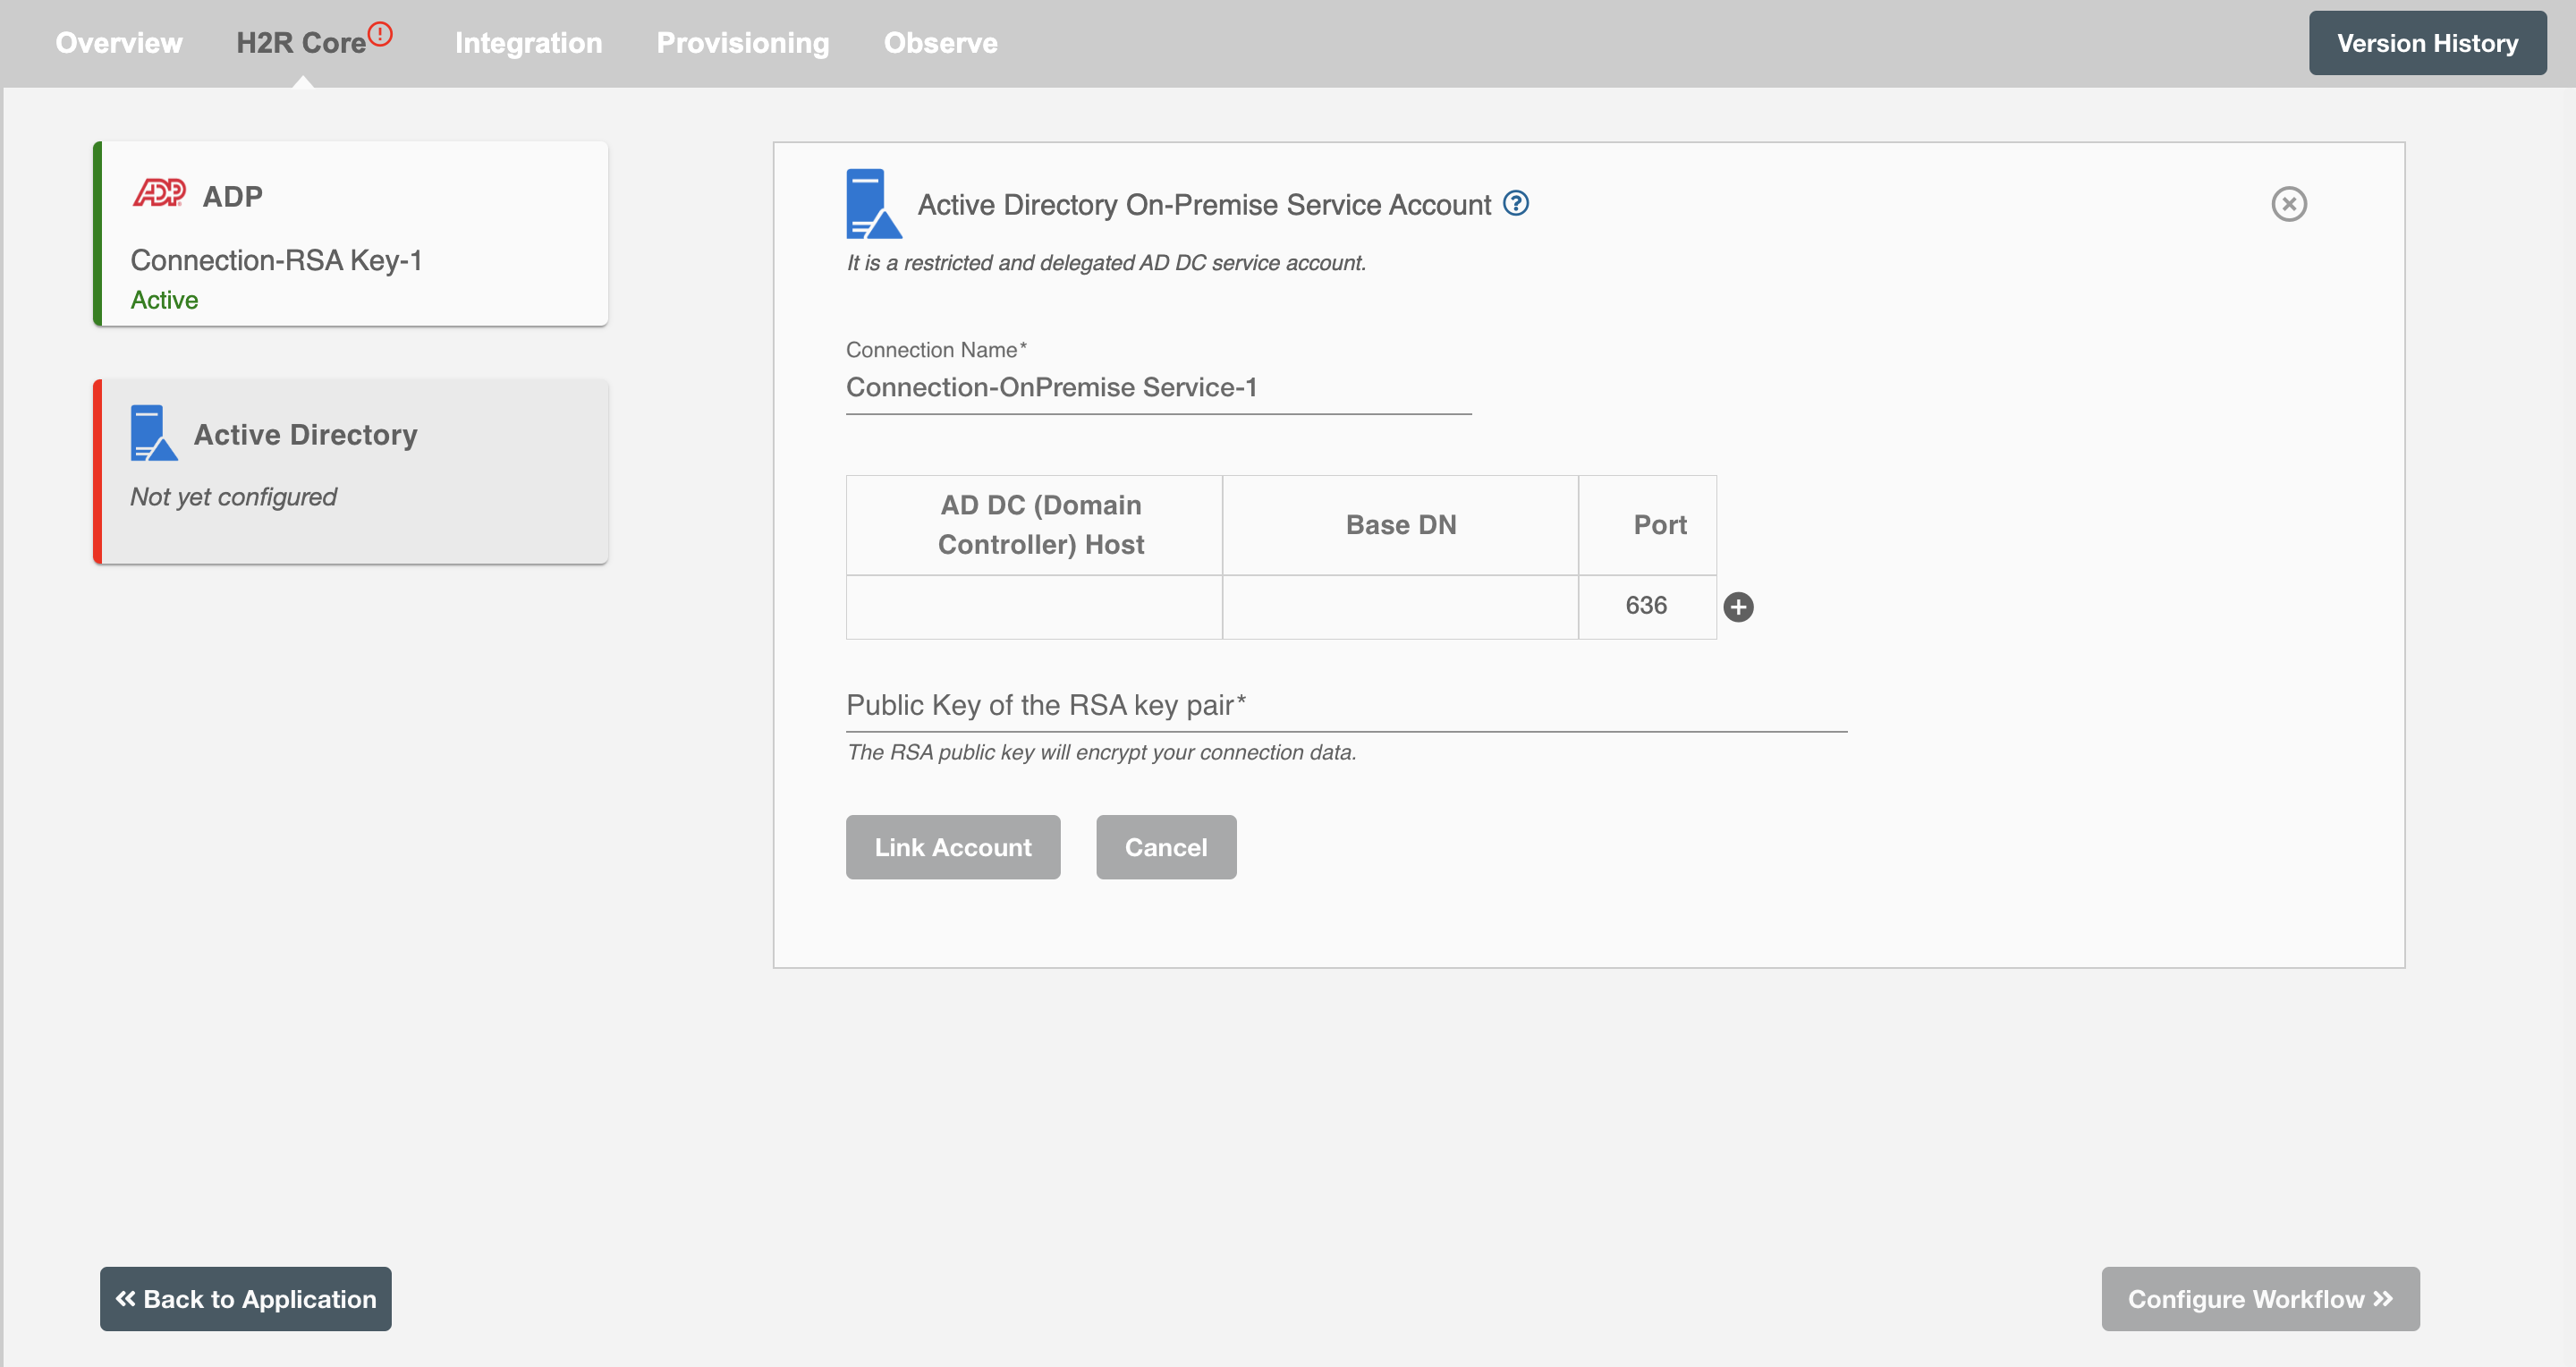
If you are configuring a connection with multi-domain controller setup, you can provide host values for each domain controller in your AD along with their respective base DN and port. You can also provide comma separated list of IP/host addresses for each domain controller.
After filling in the credentials you need to clicks on the "link account" button. After account is successfully linked, follow the Instructions given below to setup Active Directory On-Prem Agent.
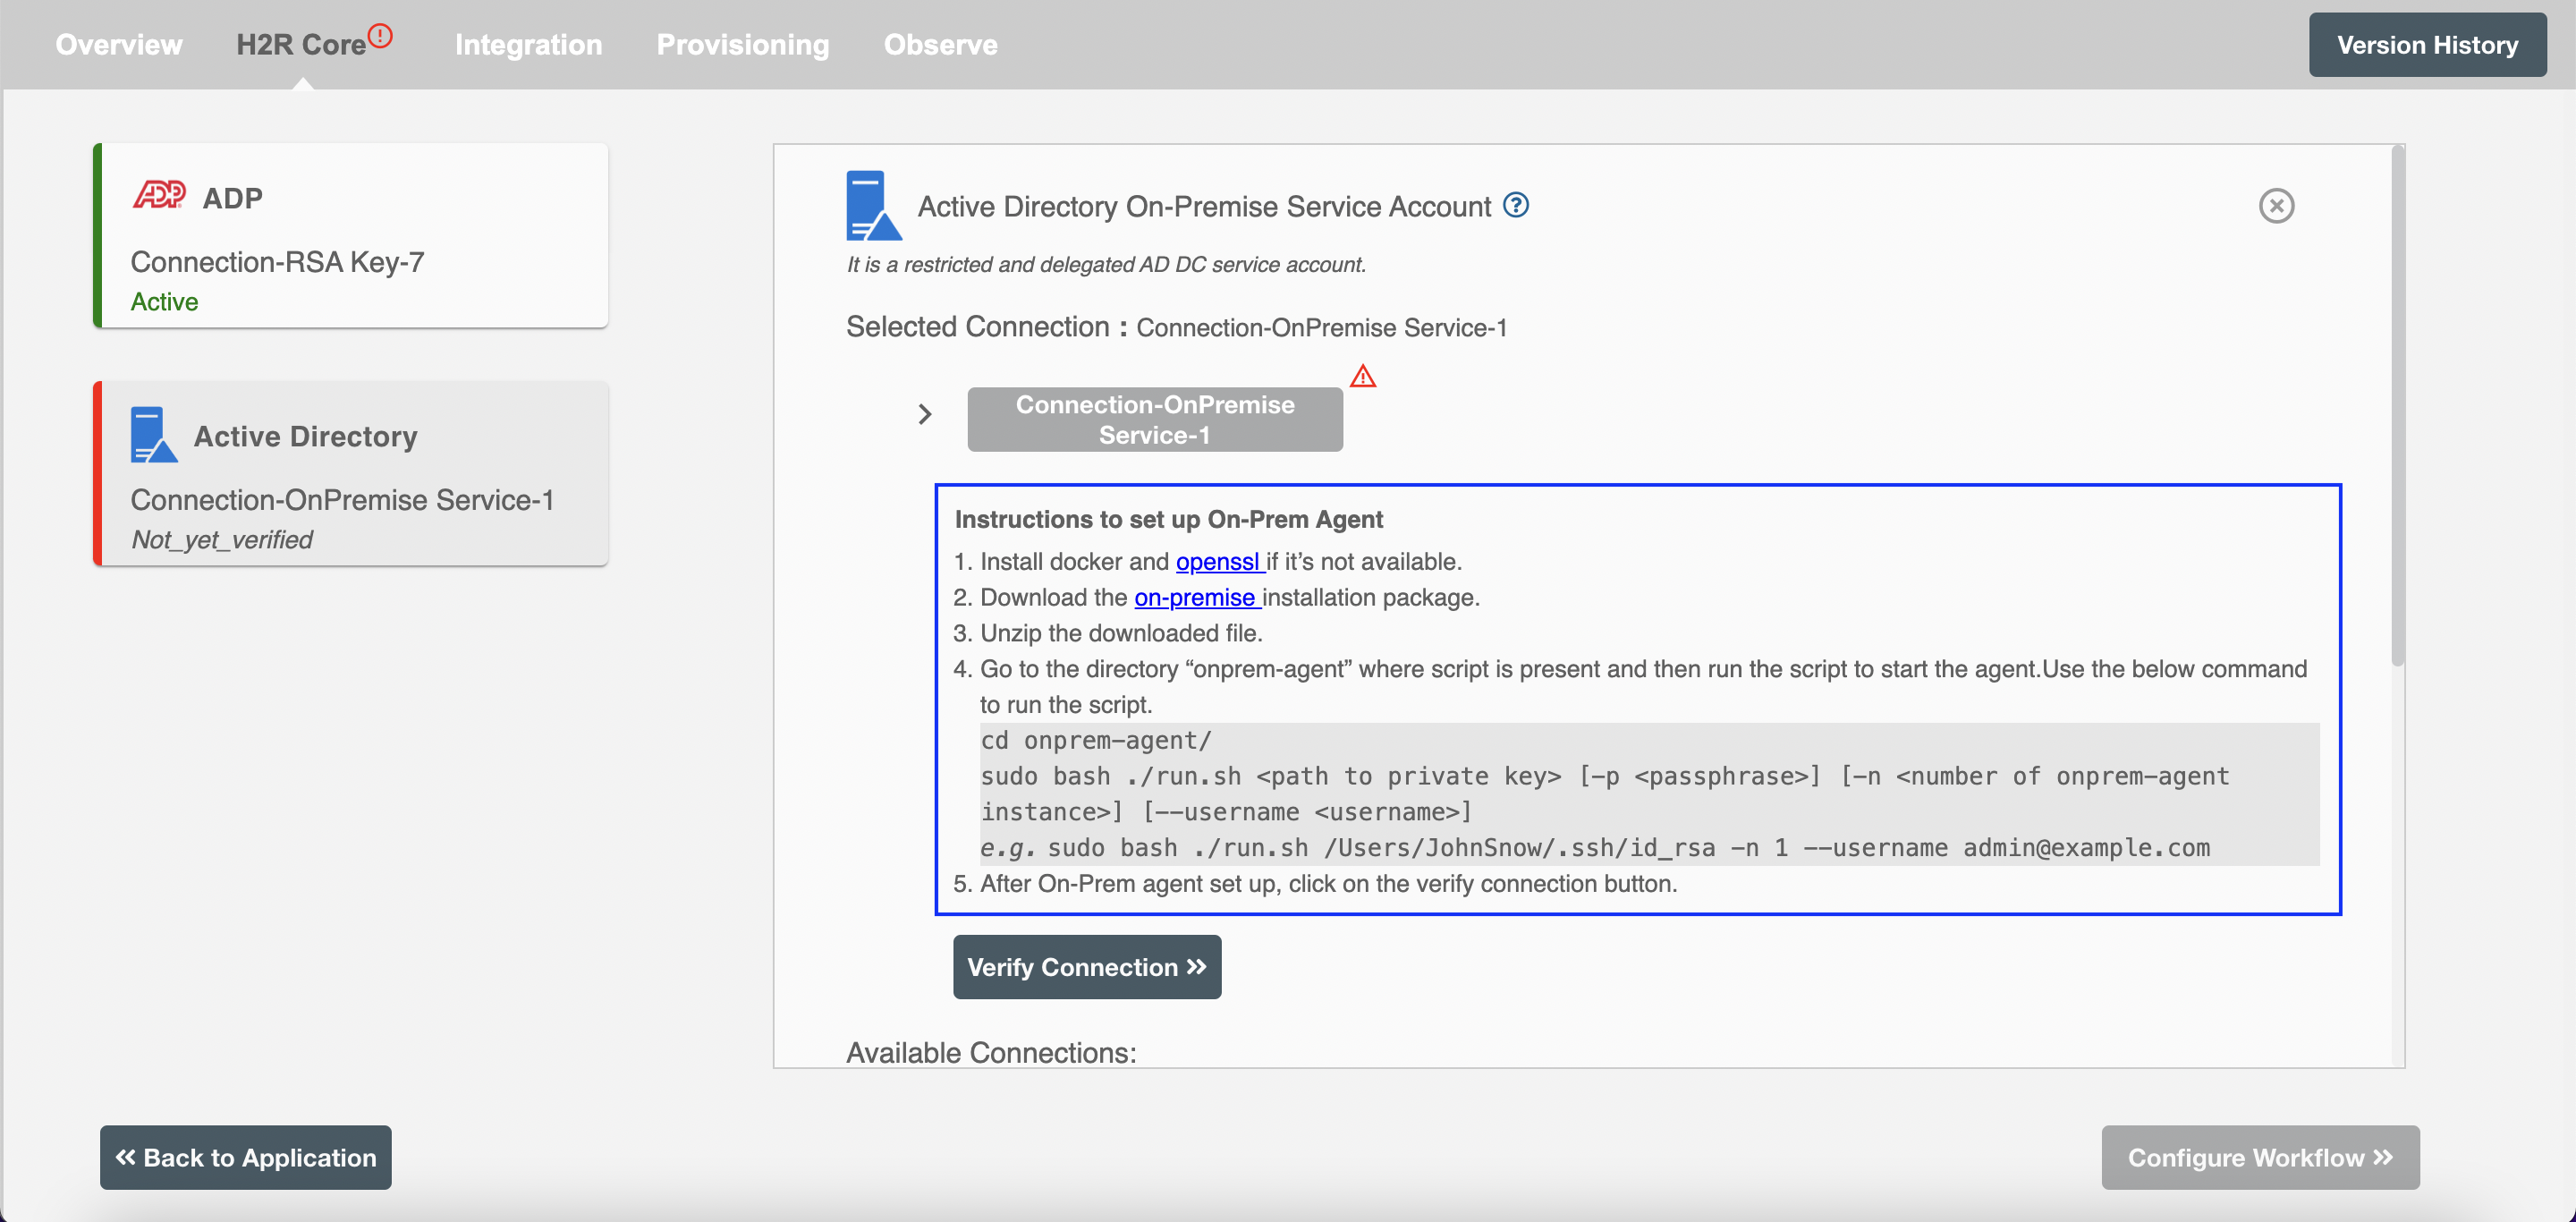
Instructions to set up On-Prem Agent
-
Before you start installing the software, ensure you have Docker and OpenSSL on your server.
Try running docker info on command line interface of your server, if docker is installed, you should get a error free response.
If you don't have Docker and OpenSSL installed, don't worry! Follow these guides Docker, and OpenSSL for setting them up before we proceed with the installation. Docker helps run the agent on your server in an isolated environment, to avoid conflicts. OpenSSL ensures your data stays safe by encrypting and decrypting files, keeping your information private. -
Start Docker on your server. This is necessary for the installation process.
-
Download the On-Premise installation package from the connection page as shown below, which contains the setup files needed to install and run the agent.
-
Unzip the installation package after it's downloaded. Inside, you'll find three files:
- config.enc
- run.sh
- secrets.enc
Before running any commands, make sure you're in the folder where you extracted the installation files.
-
Open command line interface with admin privileges on your server. For Windows Operation System it will be present as command-prompt and for MacOS and linux OS it will be present as terminal.
-
Run sudo bash ./run.sh [ path to private key ] [ -p passphrase ] [ -n number of onprem-agent instance ] [ --username username]
Make sure to provide all the options to the command in the order they are mentioned.- sudo bash ./run.sh : Starts a new bash shell for current user with the security privilege of root user.
- path to private key (REQUIRED) -- Path to user's private key. It should always be provided at first position.
- -p (OPTIONAL) : Passphrase provides an additional layer of security by encrypting your RSA private key.
- -n (OPTIONAL) : Number of onprem-agent replicas required. If not provided, number of replica by default is 1.
If you re-run the script (run.sh) all the running onprem-agent instances will be stopped and deleted and the script will start with the new number of instances provided. - --username (REQUIRED) : Admin username to access the Active Directory server.
-
-h or --help : When provided it will display the help text for the script.
Example:
-
sudo bash ./run.sh /Users/JohnSnow/.ssh/id_rsa --username admin@example.com -
With passphrase :
sudo bash ./run.sh /Users/JohnSnow/.ssh/id_rsa secret@16548 --username admin@example.com -
With number of docker containers :
sudo bash ./run.sh /Users/JohnSnow/.ssh/id_rsa -n 1 --username admin@example.com -
With all the options :
sudo bash ./run.sh /Users/JohnSnow/.ssh/id_rsa secret@16548 -n 2 --username admin@example.com
-
Run docker ps on your server to check if the agent is up and running.
Some useful docker commands:Command Usage docker ps list all the running containers docker ps --all list all the containers, including stopped containers docker logs [ container name ] It will fetch logs from a specified container docker rm [ container name ] remove a container -
After set up of installed package , click on the "Verify Connection" button.
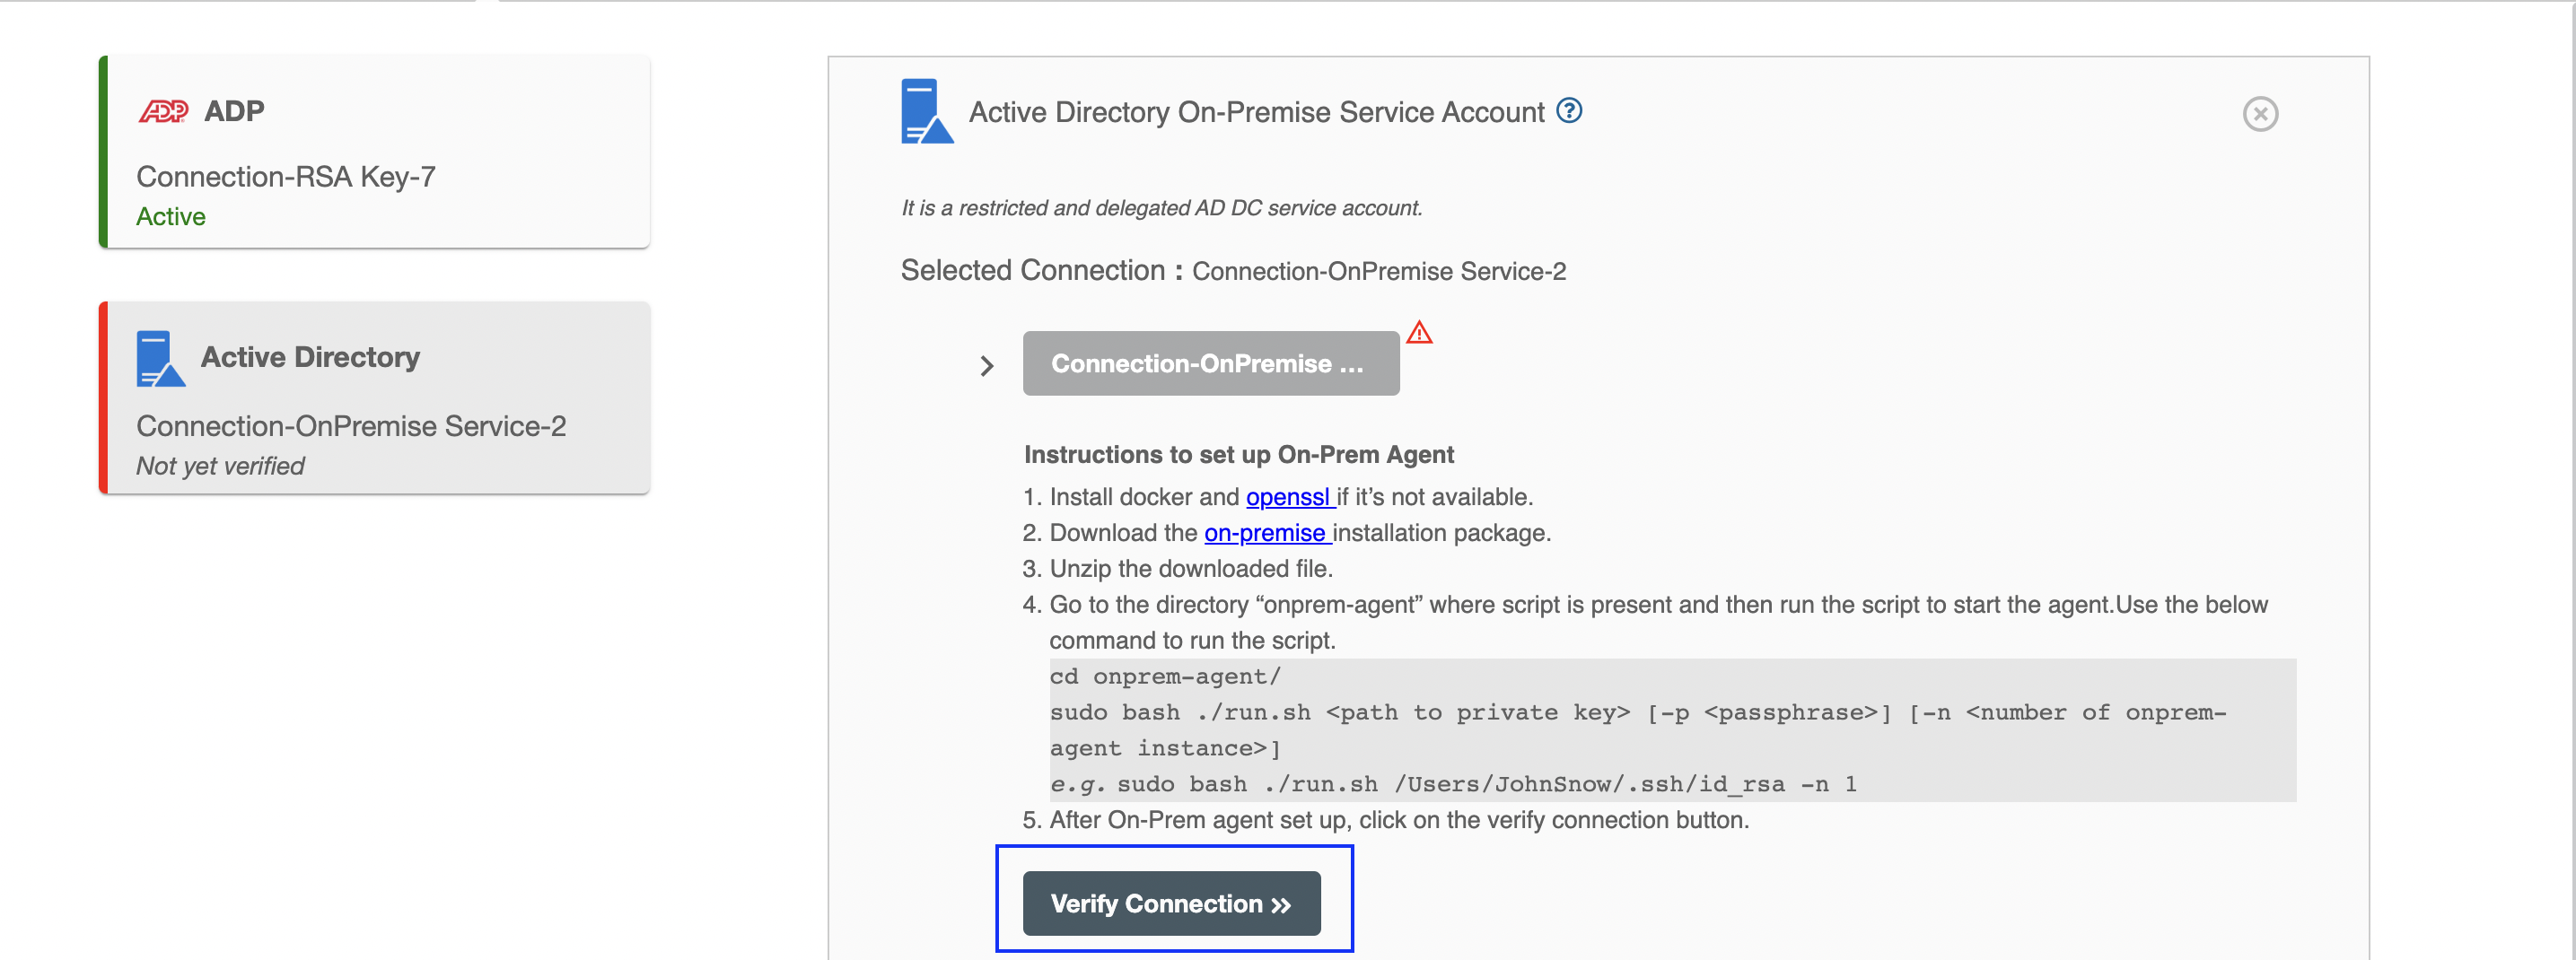 Figure 4. Verify Connection button
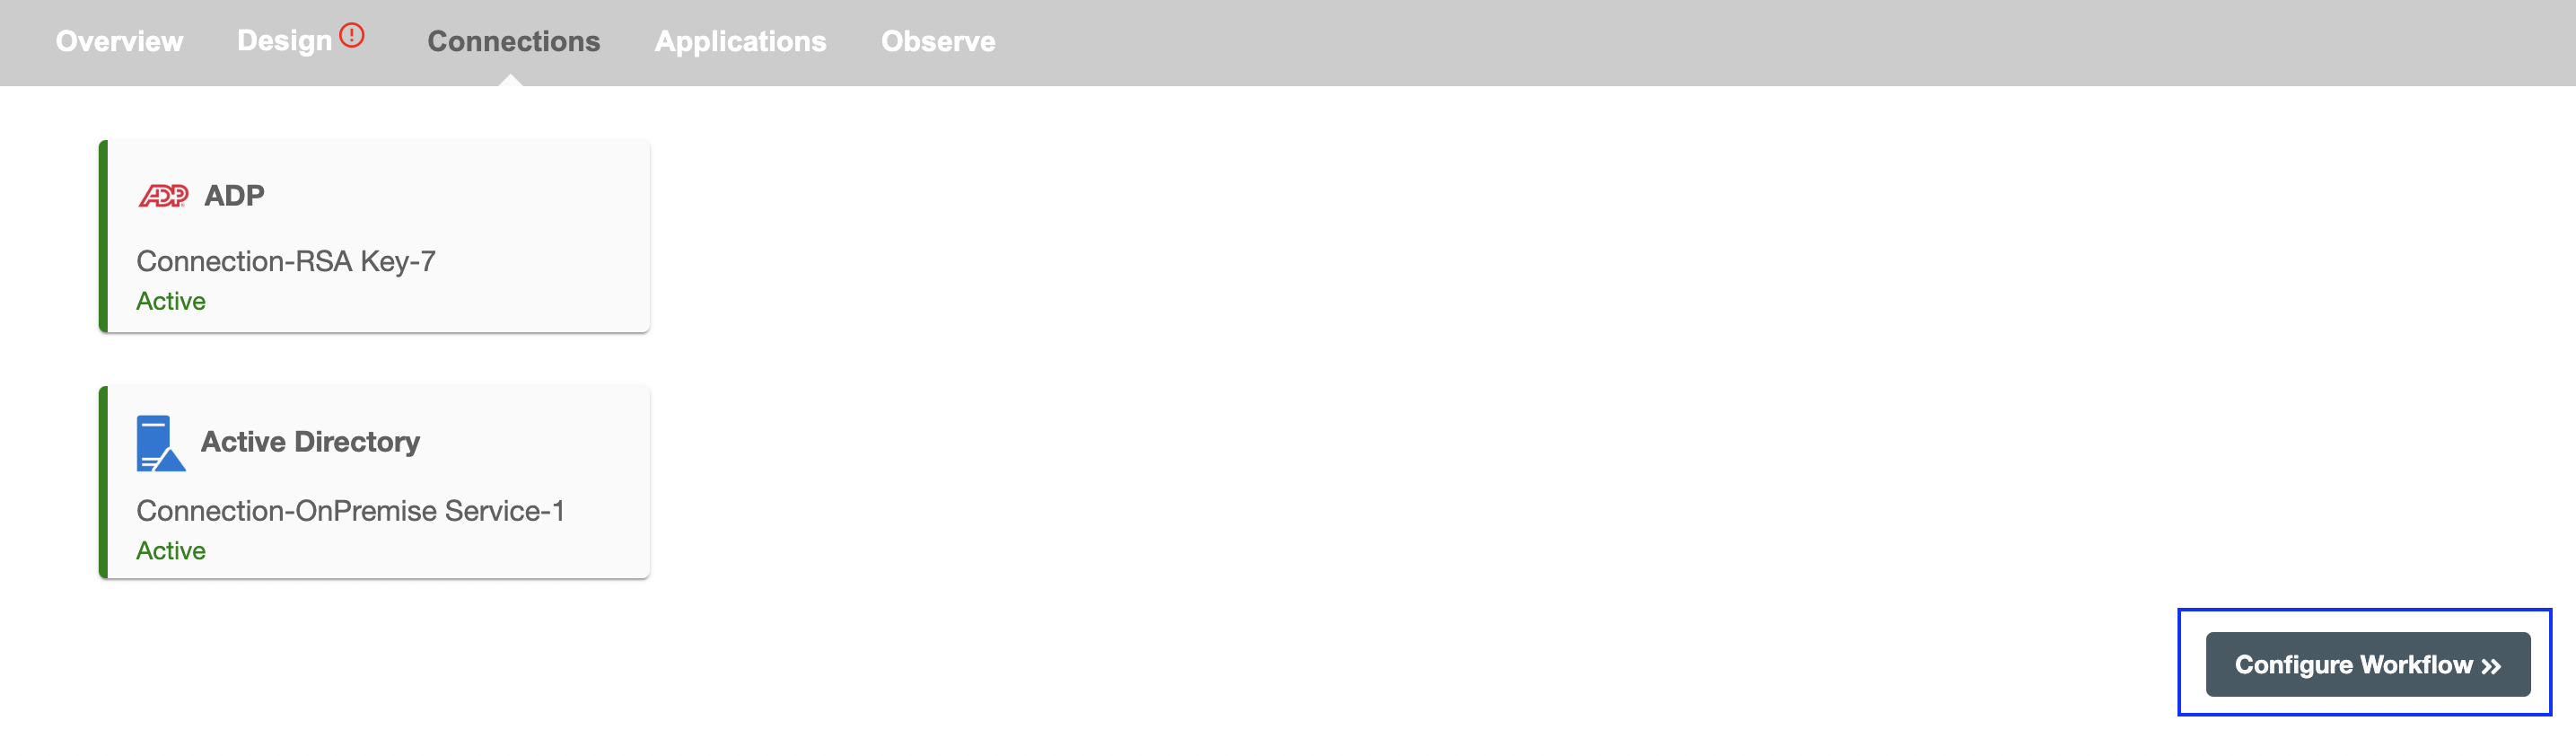
Once the On-Premise agent is up and running with connection verification, user can continue to configure the workflow by clicking on "Configure Workflow" button.
How to stop the running On-Premise agent docker container
When the flow is paused or deleted, user can to stop the docker container using command given below
$ docker ps

$ docker container stop CONTAINER ID [CONTAINER...]
Example: docker stop 733e33bfe48b